
If you look at the documentation of FocusScope, you will see this:
Focus scopes assist in keyboard focus handling when building reusable QML components.
God I wish I could understand the entirety of FocusScope by reading this line of text. To be fair, the documentation has links to a rather elaborate article which explains how keyboard focus works in QML, and somewhere in that article FocusScope is also covered. However, honestly speaking that article will likely leave you more confused about FocusScope.
In this blog, I want to demystify keyboard focus and FocusScope, so that you can use it with utmost confidence and you know exactly what you are getting into.
Understanding Keyboard Focus
First, let’s understand keyboard focus itself. QML’s Item has a focus property, which can be set by the developer to true, and by default it’s false. When we set an Item‘s focus property to true, that item receives keyboard focus.
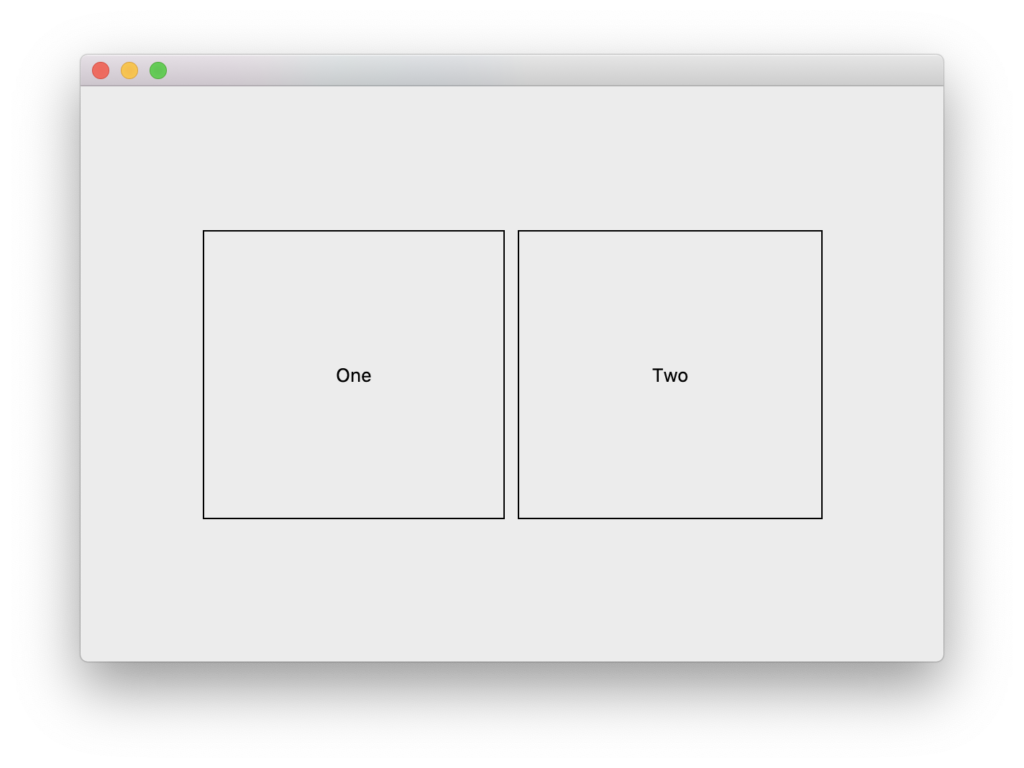
Here is a small piece of QML code in which we define a TextBox component for accepting a single line of text. We then create a form using several instances of this component.
import QtQuick
import QtQuick.Window
Window {
width: 320
height: 240
visible: true
title: qsTr("Understanding Keyboard Focus")
color: "lightsteelblue"
Grid {
columns: 2
spacing: 10
anchors.centerIn: parent
Text { text: "Name: " }
TextBox { }
Text { text: "Place: " }
TextBox { }
Text { text: "Animal: " }
TextBox { }
Text { text: "Thing: " }
TextBox { }
}
component TextBox : Rectangle {
width: 200
height: textInput.implicitHeight + 8
border {
width: textInput.focus ? 2 : 1
color: textInput.focus ? "black" : "gray"
}
TextInput {
id: textInput
width: parent.width - 8
anchors.centerIn: parent
}
}
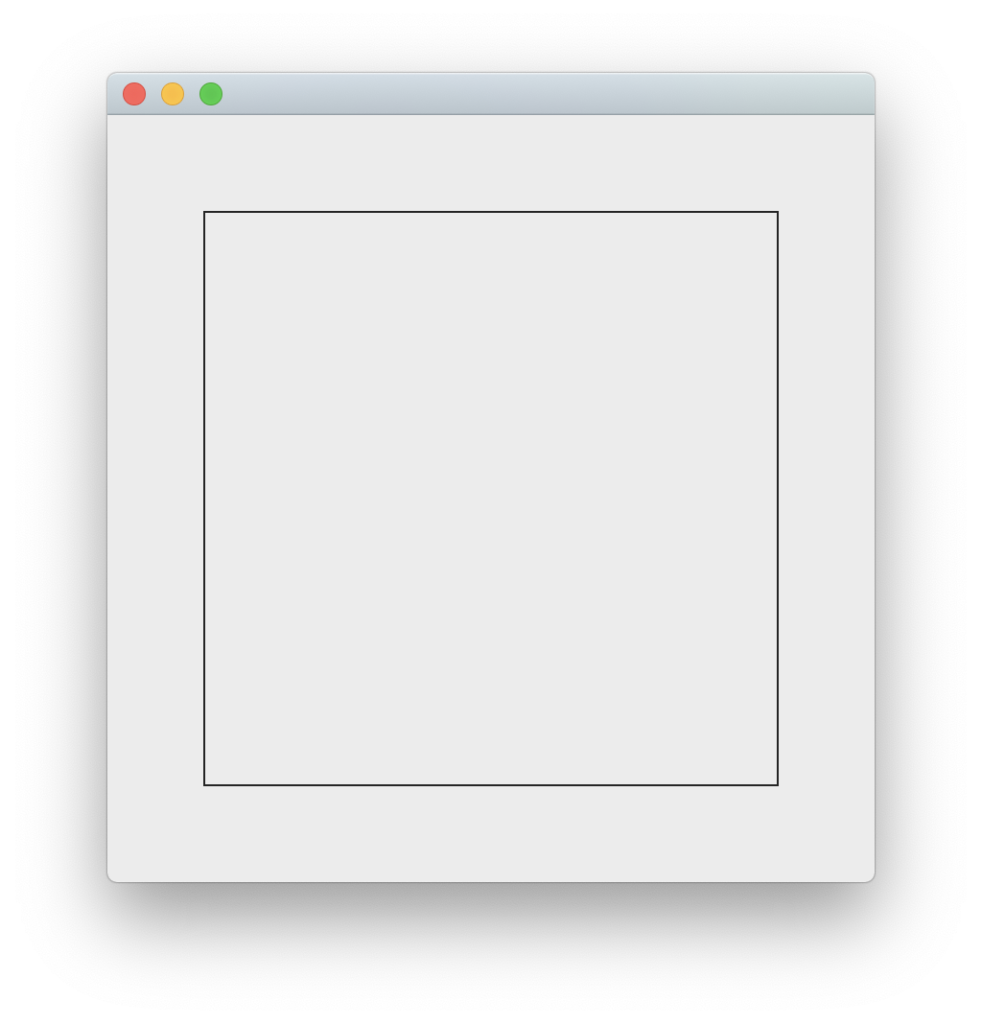
}When we execute the above QML code, we see a window like this.
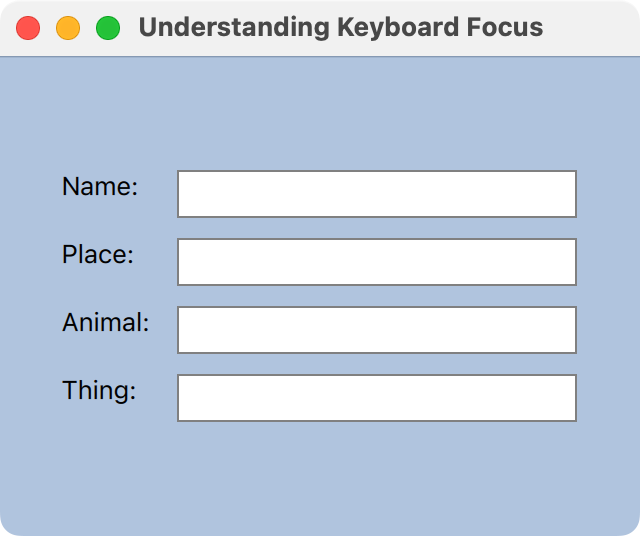
None of the TextBox instances already have keyboard focus, as evidenced by the fact that we don’t see a blinking cursor anywhere.
Let’s try to assign keyboard focus to the first TextBox, by setting it’s focus property to true.
Grid {
    columns: 2
    spacing: 10
    anchors.centerIn: parent

    Text { text: "Name: " }
    TextBox {
        focus: true
    }

    Text { text: "Place: " }
    TextBox { }

    Text { text: "Animal: " }
    TextBox { }

    Text { text: "Thing: " }
    TextBox { }
}
When we execute this piece of code, this is what we get.
!!! NO DIFFERENCE !!!
We don’t see a blinking cursor still. Why?
Because assigning focus to the TextBox item, caused its root Rectangle to receive focus and not the TextInput inside it. So, how do we get the TextInput inside it to get focus?
? What if we aliased TextBox‘s focus property to its TextInput‘s focus property? ?
component TextBox : Rectangle {
    property alias focus: textInput.focus

    width: 200
    height: textInput.implicitHeight + 8
    border {
        width: textInput.focus ? 2 : 1
        color: textInput.focus ? "black" : "gray"
    }

    TextInput {
        id: textInput
        width: parent.width - 8
        anchors.centerIn: parent
    }
}
Well, this will cause a run-time error: ?
KeyboardFocus.qml:32:9: Cannot override FINAL propertyAlright, let’s try and do this then. ? Whenever the Rectangle gets focus, let’s have TextInput‘s focus copy it. ?
component TextBox : Rectangle {
    width: 200
    height: textInput.implicitHeight + 8
    border {
        width: textInput.focus ? 2 : 1
        color: textInput.focus ? "black" : "gray"
    }

    TextInput {
        id: textInput
        width: parent.width - 8
        anchors.centerIn: parent
        focus: parent.focus
    }
}
When we execute the program, we will see that the first TextBox did get focus …

… but we see a warning on the console! ?
KeyboardFocus.qml:39:9: QML TextInput: Binding loop detected for property "focus"Why? ?
- When Rectangle‘s focus becomes true, it causes TextInput‘s focus to become true.
- Which then causes Rectangle‘s focus to become false, which will cause TextInput‘s focus to become false —- ergo, binding loop!
So, clearly this is not a good idea.
Now, back to our problem statement. How do I get TextInput to get focus when TextBox gets focus, without causing all these binding loop problems? ?
Enter FocusScope
On the one hand FocusScope is exactly like Item. It can be placed and sized like any Item. It can also be anchored exactly like an Item, and it has no visual appearance, exactly like Item which has no visual appearance either. But that’s where the similarities end. What a FocusScope actually does is, it forwards any focus it receives to that one child item within it whose focus property was hard-coded to true.
FocusScope is like a proxy. Veteran QtWidgets users would have used QLabel::setBuddy() to forward focus from a QLabel to any QWidget next to it. That’s kind of what FocusScope does. I would have actually preferred the item to be called FocusProxy (or even FocusBuddy) because that’s exactly what it does. As a QML developer, you can package a complex component inside a FocusScope, in which one of the child items has its focus property set to true. The item whose focus property is set to true will receive focus, when the root FocusProxy receives keyboard focus.
component TextBox : FocusScope {
    width: 200
    height: textInput.implicitHeight + 8

    Rectangle {
        id: background
        anchors.fill: parent
        border {
            width: textInput.focus ? 2 : 1
            color: textInput.focus ? "black" : "gray"
        }

        TextInput {
            id: textInput
            width: parent.width - 8
            anchors.centerIn: parent

            // We mark this TextInput as the item
           // which is supposed to get focus when
           // the FocusScope of the TextBox gets
           // focus.
            focus: true
        }
    }
}
Said in other words, FocusScope receives focus only to forward it to that one child item within it whose focus property was set to true.
Now, when we run the application we will see that the first TextBox actually received keyboard focus, because it has a blinking cursor ….
… but all the TextBoxes have thick borders !!!!
Wait a minute. Let’s go back that code where we determine the border thickness.
component TextBox : FocusScope {
    width: 200
    height: textInput.implicitHeight + 8

    Rectangle {
        id: background
        anchors.fill: parent
        border {
            // Border is thick and black,
           // if textInput has focus=true
            width: textInput.focus ? 2 : 1
            color: textInput.focus ? "black" : "gray"
        }

        TextInput {
            id: textInput
            width: parent.width - 8
            anchors.centerIn: parent
            focus: true
        }
    }
}
Clearly all the four TextInput instances within the four TextBox items have their focus property set to true.
Look ma, many items seem to have focus!!!
Shouldn’t only one item have focus?
Yes, only one item actually has keyboard focus. Really, pinky swear. Believe me. I am telling the truth. ?
But within a FocusScope, its possible for an item can have its focus property set to true, without it actually having focus. ?
Let’s demystify this. Take a look at this code:
component ThickRectangle : Item {
    width: 80; height: 80

    Rectangle {
        anchors.fill: parent
        border { width: focus ? 4 : 1; color: "black" }
        focus: true
    }
}

Grid {
    columns: 2
    spacing: 5

    ThickRectangle { }
    ThickRectangle { }
    ThickRectangle { }
    ThickRectangle { }
}
We are defining a component called ThickRectangle whose border width becomes “thick” when it has keyboard focus. We then place 4 of these within a Grid positioner. Notice that the Rectangle item within ThickRectangle component requests for focus upon creation. When we execute this program, we will see ….
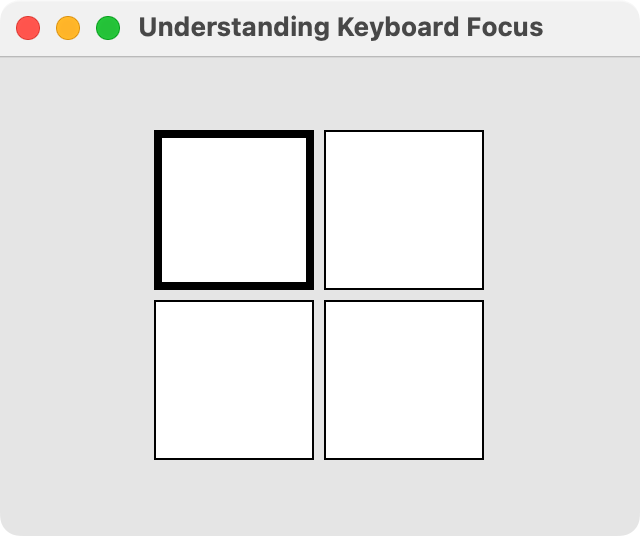
… only the first rectangle actually receiving focus. This means that the focus property value on other rectangles became false. We can now relax, QML engine is working fine. Only one of the items actually got focus and actually has focus property set to true, even though many had set their focus property to true in code. So far, so good.
The QML engine assigns focus to the first item that requested for focus, which consequently causes focus on all other items to become false, even though it was initialised as true in code.
Now, let’s change one small thing in the code.
component ThickRectangle : FocusScope {
    width: 80; height: 80

    Rectangle {
        anchors.fill: parent
        border { width: focus ? 4 : 1; color: "black" }
        focus: true
    }
}

Grid {
    columns: 2
    spacing: 5
    anchors.centerIn: parent

    ThickRectangle { }
    ThickRectangle { }
    ThickRectangle { focus: true }
    ThickRectangle { }
}
Notice that the root item of ThickRectangle component is now a FocusScope, instead of Item. And, we are setting focus of the third instance of ThickRectangle to true. This time, when we run the program we will see ….
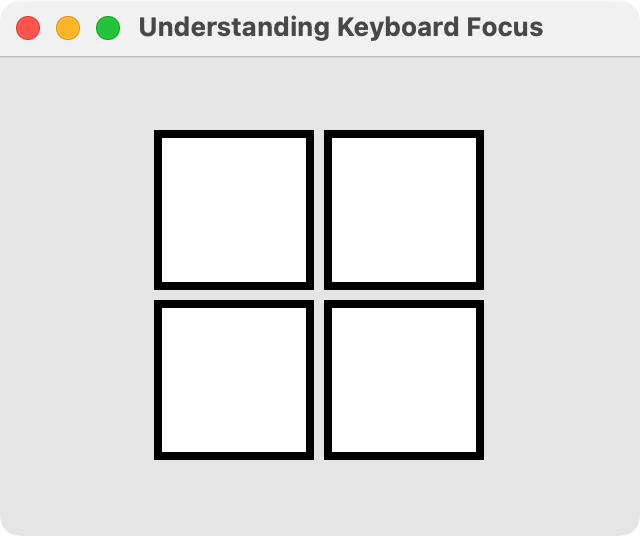
… all Rectangles within ThickRectangle instances have their focus property set to true. But I promise, only the third item really really really has focus.
You see, the value of focus property in an item within a FocusScope is not used to signify which item has focus, but it is rather used to signify which item should get focus whenever the FocusScope receives focus.
For that reason, within a FocusScope it’s best to make use of Item.activeFocus to test if an item really has focus. Item.activeFocus is a read-only property, which will become true when an item has “active focus” (or real focus). This property is set by the underlying runtime and is always a dependable source of truth regarding keyboard focus, even within a FocusScope. So, let’s use this in addition to focus in our code.
component ThickRectangle : FocusScope {
    width: 80; height: 80

    Rectangle {
        anchors.fill: parent
        border { width: focus ? 4 : 1; color: "black" }
        color: activeFocus ? "lightsteelblue" : "white"
        focus: true
    }
}

Grid {
    columns: 2
    spacing: 5
    anchors.centerIn: parent

    ThickRectangle { }
    ThickRectangle { }
    ThickRectangle { focus: true }
    ThickRectangle { }
}
In this code, while border thickness is determined by focus, fill color is determined by activeFocus. Now, when we run the code we will see ….
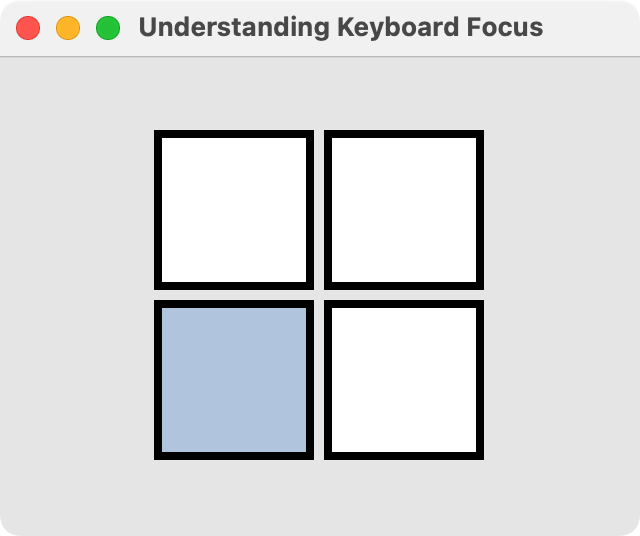
… all rectangles continue to have thick borders, but only the third item (the one with real focus) has lightsteelblue fill color. See, I told you so!
So, moral of the story is: within a FocusScope, always use activeFocus to determine who has real focus.
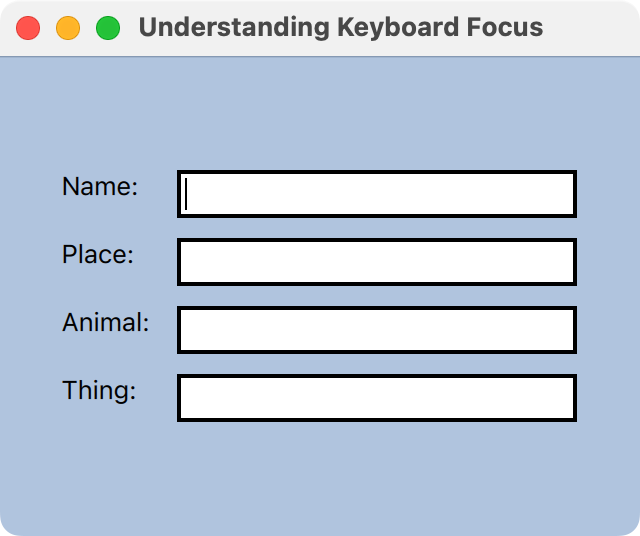
Okay, coming back to our TextBox example. Let’s use activeFocus to provide thick border on our Rectangle now.
component TextBox : FocusScope {
width: 200
height: textInput.implicitHeight + 8
Rectangle {
id: background
anchors.fill: parent
border {
width: textInput.activeFocus ? 2 : 1
color: textInput.activeFocus ? "black" : "gray"
}
TextInput {
id: textInput
width: parent.width - 8
anchors.centerIn: parent
focus: true
}
}
}
Grid {
columns: 2
spacing: 10
anchors.centerIn: parent
Text { text: "Name: " }
TextBox { }
Text { text: "Place: " }
TextBox { }
Text { text: "Animal: " }
TextBox { focus: true }
Text { text: "Thing: " }
TextBox { }
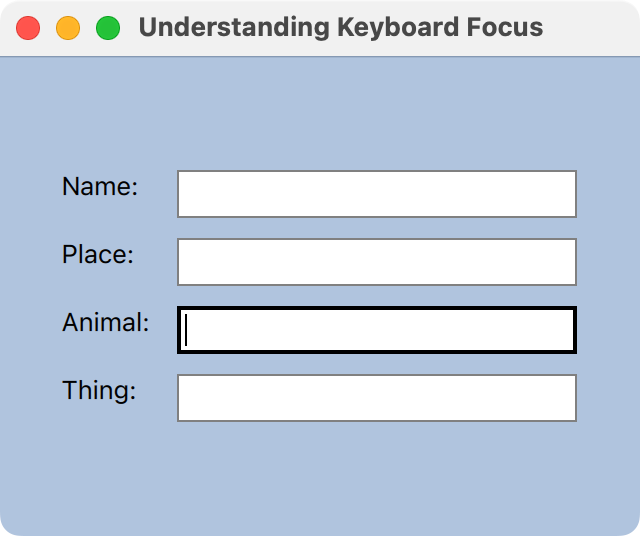
}Now, when I run the program I will see that only the TextBox I set focus to will have keyboard focus.
Now, we are getting somewhere. Isn’t it?
In summary: FocusScope forwards keyboard focus to a specific child item within it. Said in other words, FocusScope behaves like a proxy for receiving keyboard focus into a specific child item.
What if we have FocusScope within FocusScope?
Consider this code:
component Form : FocusScope {
    width: formLayout.width
    height: formLayout.height

    Grid {
        id: formLayout
        columns: 2
        spacing: 10

        Text { text: "Name: " }
        TextBox { }

        Text { text: "Place: " }
        TextBox { }

        Text { text: "Animal: " }
        TextBox { focus: true }

        Text { text: "Thing: " }
        TextBox { }
    }
}

component TextBox : FocusScope {
    width: 200
    height: textInput.implicitHeight + 8

    Rectangle {
        id: background
        anchors.fill: parent
        border {
            width: textInput.activeFocus ? 2 : 1
            color: textInput.activeFocus ? "black" : "gray"
        }

        TextInput {
            id: textInput
            width: parent.width - 8
            anchors.centerIn: parent
            focus: true
        }
    }
}
Here, we notice
- TextBox is a FocusScope which forwards focus to the TextInput item inside it.
- Form is a FocusScope which forwards focus to the third TextBox inside it.
Now, when we create an instance of the Form item like this …
Form { }… none of the fields will actually get focus, because the Form item (which is a FocusScope) doesn’t have “real focus” (or activeFocus). However, the third TextBox‘s focus property will be true and within that the TextInput item’s focus will be true. That’s okay, because like I said before the meaning of focus property within a FocusScope is different. It only signifies which item will receive focus, should the FocusScope actually get focus. If the FocusScope itself doesn’t have focus, then none of the items have focus anyway.
But when I set focus on the Form …
Form { focus: true }… the FocusScope which the form is forwards focus to the third TextBox, which is another FocusScope that forwards focus to the TextInput within it. And we get exactly what we were hoping to get:
FocusScope is a proxy for a child-item’s focus, and if that child-item is a FocusScope then it will proxy for its child-item and so on, until an actual item receives keyboard focus. Clear now?
In all honesty, this wouldn’t have been so damn confusing if it was called FocusProxy instead of FocusScope.